


Meghan Markle and Prince Harry’s wedding will be here sooner than we know and while we continue to learn more and more about their big day, there’s still a lot up in the air—especially when it comes to the food. Yes, we know what’s in store when it comes to their cake, like the fact that it will emphasize spring florals, but in order to get a (delicious) guess as to what else could be served, we reached out to three of London’s top institutions to hear their predictions. Below, the Connaught Bar’s mixologist, a chef from Claridge’s, and a pastry chef from The Berkeley share their ideas of what makes for royal wedding-worthy food.
The Fleurissimo cocktail was created in honor of one very special former guest at The Connaught: Princess Grace of Monaco. (Who was the original American actress to fall in love and marry a prince.) The Berkeley, which will be offering a “Royal Wedding Pret-a-Portea Masterclass” in May to celebrate the occasion, has already come up with these adorable wedding dress and shoe-shaped cookies as part of their royal wedding plans. And finally, Claridge’s chicken pot pie is simply an institution. The best part? The recipe for all three dishes are below. Consider yourself ready for any royal wedding viewing parties.
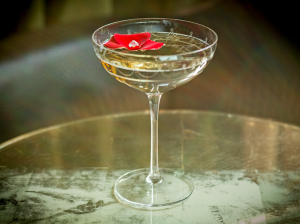
Photo: Courtesy of Connaught Bar
The Fleurissimo:
A cocktail by Agostino Perrone, Master Mixologist for the Connaught Bar
Ingredients:
1 white sugar cube
5 dashes Peychaud’s bitter
5ml violet liqueur
15ml Remy Martin VSOP cognac
Champagne
Instructions:
Soak the sugar cube with Peychaud’s bitter and gently drop in the champagne coupe filled with the rest of the ingredients. Top up with champagne. Garnish with a rose petal.
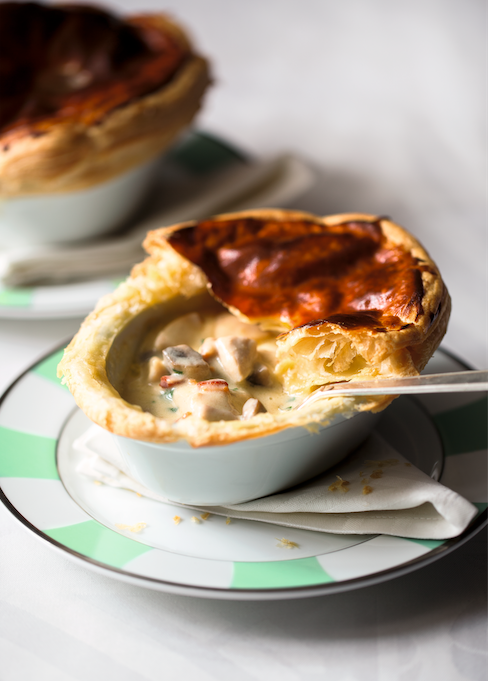
Claridge’s Chicken Pie:
From Claridge’s Executive Chef Martyn Nail
Ingredients for the pie filling and assembly:
120g pearl onions
plain flour, for dusting
1-1.2kg cold puff pastry
2 egg yolks, beaten, for eggwash
600g chicken breast, cut into 5cm cubes, seasoned with sea salt and freshly ground black pepper
2 tbsp vegetable oil, plus extra if required
120g steaky bacon, cut into lardons
100g small button mushrooms, quartered
10g flat-lead parsley, finely chopped
4 quail eggs, hard-boiled, shelled
Ingredients for the supreme sauce:
2 tbsp vegetable oil
400g boneless, skinless chicken thighs, cubed
100g shallots, finely chopped
1 garlic clove, peeled and left whole
100g button mushrooms, sliced
300ml dry white wine
1 bay leaf
1 rosemary sprig
3 thyme sprigs
650ml double chicken stock, plus extra if required
500ml double cream, plus extra if required
25g unsalted butter
25g plain flour
sea salt and freshly ground black pepper
Instructions:
Cook the pearl onions in their skins in a medium saucepan of salted boiling water for 5-7 minutes. Rinse under cold running water to cool, then peel and set aside.
On a lightly floured surface, roll out the puff pastry to a rectangle, about 30 x 60 cm and 2 mm thick. Starting at the top of the rectangle and with the long edge facing you, use a sharp knife or a pizza wheel to cut out 4 oval lids 14 x 20 cm. Alternatively, cut out 4 lids of the shape of your chosen vessels, or 1 large lid, as needed–you can place on of the dishes directly on to the pastry to use as a guide making sure you add on an extra 2 cm all around for overhang. Use the 2 cm pastry cutter to cut out a steam “chimney” in the center of each lid. Next, from the bottom of the rectangle, cut away 4 full-length strips of pastry, each about 2 cm wide–these will form the edges along the rim of each dish to support the pastry lid. Finally, use the larger pastry cutter to cut out 4 rounds of pastry in what is left of the puff pastry rectangle, then cut out a 2 cm hole in the center of each–these are the decorative rings for each chimney. Now brush a little egg-wash around the edge of each of the chimneys and lay 1 decorative ring on top of each chimney, pressing gently to encourage the seal. Stack the 4 lids and the long strips on top of each other, separated by sheets of baking paper, transfer to a tray and refrigerate until assembly time. Discard any leftover pastry.
To make the supreme sauce, heat the oil in a medium frying pan or wide saucepan over a medium heat, add the chicken thighs and lightly cook on all sides for about 4 minutes, until lightly browned. Add the shallots along with the garlic and mushrooms and cook until soft and the onions are translucent, about 5 minutes. Add the white wine, bay lead, rosemary and thyme and reduce the liquid by half, still over a medium heat, about 6-8 minutes. Add the stock and continue to cook for 15 minutes. Stir and skim occasionally, removing any sediments. Pass through the sieve into a saucepan, then add the cream and bring to a boil over a medium heat. Simmer to reduce until the sauce coats the back of a spoon, about 25 minutes. Meanwhile, in a small pan, melt the butter over a medium heat until frothy, then stir in the flour until you have a smooth paste and cook for 2-3 minutes, stirring continuously over a low heat. Remove from the heat. When the cream sauce has reduced sufficiently, whisk a little of the cream sauce into the flour mixture until smooth, then return this to the supreme sauce, stirring to incorporate–you should have 1 liter of sauce (don’t worry if you’re a little short–just adjust with additional stock or cream as desired). Season to taste, then cover and set aside.
Now you’re ready to work on the remainder of the pie components. In a large frying pan, sear the diced chicken breast in the vegetable oil over a medium-high heat until it colors slightly, then transfer to the saucepan with the supreme sauce, reserving the frying pan for the bacon and mushrooms. Bring the sauce to a boil, then simmer over a medium heat for 30 minutes, stirring occasionally.
While the chicken is cooking in the sauce, saute the bacon lardons in the reserved frying pan until crispy. Use a slotted spoon to transfer to a bowl and set aside. Now, still in the same pan, saute the mushrooms until golden brown, adding a splash more vegetable oil to the pan if needed. Set aside in another bow.
Using a slotted spoon, portion the pieces of chicken equally into pie dishes. Then divide the peal onions, mushrooms, bacon and parsley equally between them. Add one-quarter of the supreme sauce to each dish. The filling should fill each vessel about two-thirds full. Finally, carefully add 1 quail egg to each. Refrigerate for 2 hours or longer, until completely cool.
Preheat the over to 425 degrees Fahrenheit.
Brush the rim of each dish with eggwash. Lay a strip of puff pastry all along the edge of each dish, pressing down gently in the center of the strip to help it adhere to the rim, overlapping the 2 ends and eggwashing them together to form a seal. Next, eggwash the whole strip and carefully drape the puff pastry lids atop each vessel, allowing for a 2 cm overhang all around. Press down gently to form a seal between the rims and the lids. Brush each lid with eggwash.
Place the pies on a baking sheet and bake for 25 minutes, until deep golden brown (a few minutes longer if you’re making 1 large chicken pie). Leave to cool for 3 minutes before serving with your favorite mashed potato, green beans and a bottle worthy of your labor.
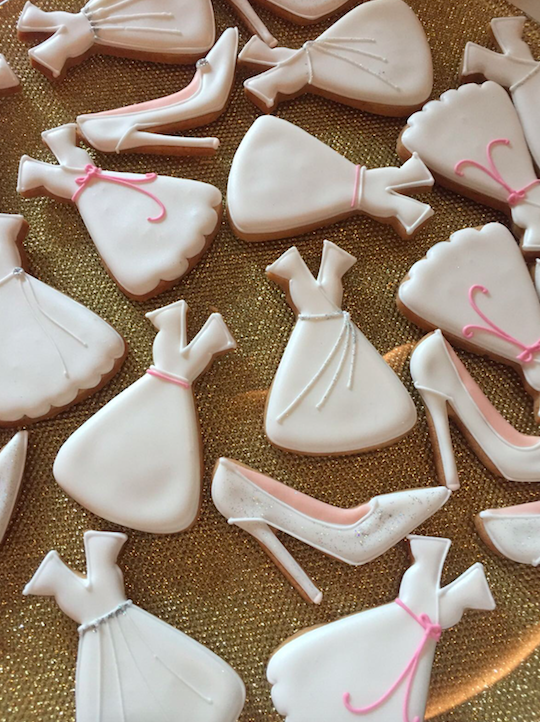
Bridal Biscuits:
By The Berkeley’s Head Pastry Chef Mourad Khiat
Vanilla Stiletto Biscuit Ingredients:
70g unsalted butter, softened
70g caster sugar
1 large egg
160g plain flour, sifted, plus extra for dusting
To make a Vanilla stiletto add 1 vanilla pod
Chocolate Wedding Dress Biscuit Ingredients:
70g unsalted butter, softened
70g caster sugar
1 large egg
150g plain flour, sifted, plus extra for dusting
10g cocoa powder
Instructions:
Beat the butter and sugar until pale and fluffy. Add the egg and your chosen flavoring at this stage and beat for another minute. Quickly mix in the flour until it has combined – be sure not to over mix. Wrap the dough in cling-film and put it in the fridge to rest for 1½ hours. Meanwhile, prepare your designer template – either your wedding dress or chic stiletto shoe – by tracing the shape from the back of the book onto a plastic lid and cutting it out. Once the dough has rested, take it out of the fridge and knead it gently. Dust your work surface and rolling pin with flour, and roll the dough out to a thickness of 5mm.
Tip: If you find the dough a bit sticky, try sandwiching it between two sheets of baking parchment and rolling that instead. Transfer the rolled-out dough carefully to a baking sheet (your rolling pin should help here) and return it to the fridge for another 30 minutes. Preheat the oven to 180°C/160°C fan/Gas 4. Line a baking sheet with baking parchment. Take the chilled dough out of the fridge and place the template you have made on top. Carefully cut around it with a small, sharp knife to create your collection of mini pieces. Place the cut biscuit shapes on the prepared baking sheet and bake for just 8 minutes, until pale brown around the edges. Remove from the oven and leave to cool on a wire rack for 20 minutes.
For the icing, whisk the egg white into the icing sugar a little at a time to create a smooth paste the consistency of lip gloss.
For the filling icing, whisk the egg whites into the icing sugar a little at a time to create a runny liquid. Filling icing needs to be a little runnier than outline icing hence the extra egg white. Add food coloring again to get the shade you want, depending on the biscuit you are making.
To ice the biscuits, fill a small piping bag no more than two-thirds full with the outline icing and cut the tip off to create a very small hole. Whatever shape you are styling, it’s the same process. First carefully pipe a line all the way around the edge of the cooled baked biscuit to create the outline, along with any other necessary line details. Follow the photographs for each designer to guide you on the details of each design. Leave to set for a few minutes. Once the outline has set, fill another piping bag with the filling icing. Cut a slightly larger hole in the tip this time and ‘flood’ the central part of the biscuit with icing until it reaches the outline. You can pick up and gently tilt the biscuit to help the icing to spread, if necessary. Leave it to dry completely, at least 1 hour, before you start working on the details, again following the photographs of the design or the original if you have it.